Last Updated 2011/09/21
データバインディングは WPF のもっとも重要なトピックの一つですが、直感的に理解することはかなり難しいと思います。このページではデータバインディングの具体的な例を挙げて、実務的な解説を試みます。
なお、記事中に出てくる個々のクラスのプロパティやメソッドの詳細については、WPF クラスライブラリリファレンスを参照してください。
WPF はデータドリブン型のプログラミングスタイルを採用しています。これを一言で言うと、プロパティの変化をとらえて何らかの動作をしようとするものです。従来の Windows アプリケーションでは当然のようにコードで実装するところを WPF アプリケーションでは XAML コードだけで実現可能にするという特徴があります。このときに重要な役割を果たすのでデータバインディングです。
Microsoft は XAML コードで可能なところはできるだけ XAML コードで処理することをすすめていますが、それほどこだわる必要はあるのかなあとの思いはあります。
データバインディングの中心となるクラスは Binding クラスですが、このクラスはきわめて抽象的なクラスでとらえどころがありません。すべてがブラックボックスになっているため、コードを書きながらもこれでいいのかと常に不安です。コーディングの自由度が大きいのも分かりにくさに輪をかけています。
ともあれ、データバインディングにはいくつかのパターンがありますから、あまりに一般的なアプローチよりも具体的な例を取り上げるほうが理解しやすいと思います。そこで、このページではできるだけ実務的な例にこだわりたいと思います。
私は用語の使い方や定義にこだわるほうですが、その点、Microsoft は熱心とはいえません。たとえば、カーソルとマウスポインタです。いまだに混用していて、特に初心者には理解しにくいと思います。WPF SDK の文章は原稿を書く人の理解する用語を使う傾向があり、読むほうを混乱に陥らせることが頻繁にあります。これから説明する用語は、WPF SDK の記事を斟酌した上で私の解釈を加えたものになっています。また、一部は基礎知識の説明になっています。
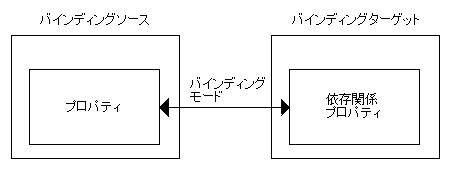
バインディング元のオブジェクトで、バインディングの対象とするプロパティは CLR プロパティでもかまいません。
バインディング先のオブジェクトで、バインディング先のプロパティは依存関係プロパティでなければなりません。したがって、依存関係プロパティをサポートする DependencyObject オブジェクトに限られます。
Binding クラスの Mode プロパティを使って設定するもので、バインディング時のデータフローの方向、つまり、データ(プロパティ値)の流れる方向をさします。通常はソースからターゲットの方向に流れますが、逆方向あるいは両方向にすることもできます。
バインディングモードが逆方向または両方向のとき、ソース値を更新するキッカケは Binding クラスの UpdateSourceTrigger プロパティで指定します。通常はプロパティ値が変化したときですが、それ以外の場合もあります。ここではあえて説明しません。
Binding クラスの Path プロパティは PropertyPath オブジェクトです。パスという呼び名に違和感を感じるのですが、パスという名がふさわしいケースがあるので、やむを得ないのでしょう。階層化しているプロパティを指定する場合がありますから。いずれにしろ、もっとも簡単なケースは単にプロパティ名になります。
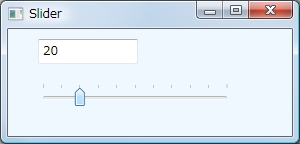
Slider コントロールの操作結果を TextBox コントロールに表示します。この場合のバインディングソースは Slider コントロールでバインディングターゲットは TextBox コントロールです。次のコードは TextBox コントロールの Text プロパティに Slider コントロールの Value プロパティとをバインドしています。
Text="{Binding ElementName=slider1, Path=Value}"
ElementName プロパティと Path プロパティとの各値は二重引用符で囲まないところに留意してください。"Value" は Slider コントロールの Value プロパティです。
<Window x:Class="SliderTest.Window1"
    xmlns="http://schemas.microsoft.com/winfx/2006/xaml/presentation"
    xmlns:x="http://schemas.microsoft.com/winfx/2006/xaml"
    Title="Slider" Height="300" Width="300" Background="AliceBlue"
  >
  <StackPanel Orientation="Vertical">
    <TextBox Name="textBox1" Width="100" Height="25" HorizontalAlignment="Left" Margin="30,10,0,0"
             Text="{Binding ElementName=slider1, Path=Value}"/>
    <Slider Name="slider1" Height="22" Margin="30,20,60,0" Maximum="100" Minimum="0"
            TickPlacement="TopLeft" TickFrequency="10" SmallChange="1" LargeChange="10"
            IsSnapToTickEnabled="True" />
  </StackPanel>
</Window>
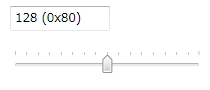
前の項目では Slider コントロールの Value プロパティをそのまま TextBox コントロールに表示していますが、表示するテキストを書式化する場合はデータを変換する仕組みが必要です。こういう場合は、IValueConverter インターフェースを継承するクラスを作成し、Binding クラスの Converter プロパティに設定します。
下図は、Slider コントロールの Value プロパティを 10 進数と 16 進数とに書式化し、表示しています。
以下のコードの中の、Window.Resources のところで、IntToHexValueConverter クラスのインスタンスを作成し、そのリソースキーとして "valueConverter" を指定しています。
次のコードで Text プロパティとバインドしています。
Text="{Binding ElementName=slider1, Path=Value, Converter={StaticResource valueConverter}}"
<Window x:Class="BindingTest.Window1"
    xmlns="http://schemas.microsoft.com/winfx/2006/xaml/presentation"
    xmlns:x="http://schemas.microsoft.com/winfx/2006/xaml"
    xmlns:c="clr-namespace:BindingTest"
    Title="Binding" Height="300" Width="300">
  <Window.Resources>
    <c:IntToHexValueConverter x:Key="valueConverter" />
  </Window.Resources>

  <StackPanel Orientation="Vertical">
    <TextBox Name="textBox1" Width="100" Height="25" HorizontalAlignment="Left" Margin="30,10,0,0"
             Text="{Binding ElementName=slider1, Path=Value, Converter={StaticResource valueConverter}}"/>
    <Slider Name="slider1" Height="22" Margin="30,20,60,0" Maximum="255" Minimum="0"
            TickPlacement="TopLeft" TickFrequency="16" SmallChange="1" LargeChange="16"
            IsSnapToTickEnabled="True" />
  </StackPanel>
</Window>
分離コードでデータコンバータクラスを定義する。
[ValueConversion(typeof(double), typeof(int))]
public class IntToHexValueConverter : IValueConverter
{
  public object Convert(object value, Type targetType, object parameter, CultureInfo culture)
  {
    double textValue = (double)value;

    return String.Format("{0} (0x{1:X2})", (int)textValue, (int)textValue);
  }

  //-----------------------------------------------------------------------------------------------
  // 今回は値を戻すことはしない
  public object ConvertBack(object value, Type targetType, object parameter, CultureInfo culture)
  {
    return Binding.DoNothing;
  }
} // end of IntToHexValueConverter class
複合データバインディングとは複数のデータとバインドすることです。このような場合は、MultiBinding クラスを利用するとともに、データを変換するクラスを作成しなければなりません。
下図は、3 つの Slider コントロールを使って、RGB の各カラー値を調整し、下部の Rectangle コントロールの背景色として設定するものです。
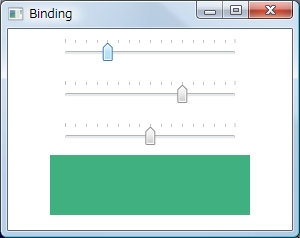
3 つの Slider コントロールの Value プロパティから Color 型に変換するクラスを作成しますが、今回の場合は IMultiValueConverter インターフェースを継承しなければなりません。
<Window x:Class="BindingTest.Window1"
    xmlns="http://schemas.microsoft.com/winfx/2006/xaml/presentation"
    xmlns:x="http://schemas.microsoft.com/winfx/2006/xaml"
    xmlns:c="clr-namespace:BindingTest"
    Title="Binding" Height="300" Width="300">
  <Window.Resources>
    <c:ColorConverter x:Key="colorConverter" />

    <Style x:Key="sliderStyle" TargetType="Slider">
      <Setter Property="Width" Value="180" />
      <Setter Property="Minimum" Value="0" />
      <Setter Property="Maximum" Value="255" />
      <Setter Property="LargeChange" Value="16" />
      <Setter Property="SmallChange" Value="1" />
      <Setter Property="TickFrequency" Value="16" />
      <Setter Property="TickPlacement" Value="TopLeft" />
      <Setter Property="IsSnapToTickEnabled" Value="True" />
      <Setter Property="Margin" Value="10" />
    </Style>
  </Window.Resources>

  <StackPanel Orientation="Vertical">
    <Slider Name="sliderRed" Style="{StaticResource sliderStyle}" />
    <Slider Name="sliderGreen" Style="{StaticResource sliderStyle}" />
    <Slider Name="sliderBlue" Style="{StaticResource sliderStyle}" />
    <Rectangle Width="200" Height="60" HorizontalAlignment="Center">
      <Rectangle.Fill>
        <SolidColorBrush>
          <SolidColorBrush.Color>
            <MultiBinding Converter="{StaticResource colorConverter}">
              <MultiBinding.Bindings>
                <Binding ElementName="sliderRed" Path="Value" />
                <Binding ElementName="sliderGreen" Path="Value" />
                <Binding ElementName="sliderBlue" Path="Value" />
              </MultiBinding.Bindings>
            </MultiBinding>
          </SolidColorBrush.Color>
        </SolidColorBrush>
      </Rectangle.Fill>
    </Rectangle>
  </StackPanel>
</Window>
分離コードでカラーコンバータを定義します。ポイントは Convert メソッドの最初の引数ですが、object 型の配列にはバインドした順番のデータがくるようです。
public class ColorConverter : IMultiValueConverter
{
  public object Convert(object[] values, Type targetType, object parameter, CultureInfo culture)
  {
    byte R = (byte)(double)(values[0]);
    byte G = (byte)(double)(values[1]);
    byte B = (byte)(double)(values[2]);

    return Color.FromRgb(R, G, B);
  }

  //-----------------------------------------------------------------------------------------------
  public object[] ConvertBack(object value, Type[] targetTypes, object parameter, CultureInfo culture)
  {
    return null;
  }
} // end of ColorConverter class
System.Windows.FrameworkElement クラスと System.Windows.FrameworkContentElement クラスとに DataContext プロパティがあります。これはデータバインディングのためのオブジェクトを関連付けるものです。オブジェクトは通常、データを定義するクラスのインスタンスです。
Binding クラスの RelativeSource または Source プロパティの設定がない場合に DataContext プロパティの設定が有効になります。
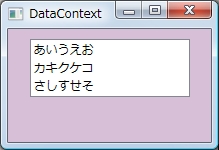
下図は、単純に文字列のコレクションオブジェクトを DataContext プロパティに設定します。
<Window x:Class="BindingTest.Window1"
    xmlns="http://schemas.microsoft.com/winfx/2006/xaml/presentation"
    xmlns:x="http://schemas.microsoft.com/winfx/2006/xaml"
    xmlns:local="clr-namespace:BindingTest"
    Title="DataContext" Height="200" Width="200" Background="Thistle">

  <Window.Resources>
    <local:StringList x:Key="list" /> ← ここで StringList オブジェクトを作成し、リソース名として "list" を指定する
  </Window.Resources>

  <StackPanel Orientation="Vertical" DataContext="{Binding Source={StaticResource list}}">
    <ListBox Width="160" Margin="10" ItemsSource="{Binding}" /> ← すでにバインドするものが分かっているので
  </StackPanel>
</Window>
DataContext プロパティに設定するクラスを定義します。ここでは List<string> クラスにしました。
public class StringList : List<string>
{
  public StringList()
  {
    this.Add("あいうえお");
    this.Add("カキクケコ");
    this.Add("さしすせそ");
  }
}
ところで、DataContext プロパティは FrameworkElement または FrameworkContentElement クラスにありますから、ビジュアルなコントロールのすべてのコントロールにあります。もちろん、Window クラスを含みます。上記の例では、StackPanel コントロールの DataContext プロパティに設定しましたが、Window クラスに設定するとどうなるでしょう。
<Window x:Class="BindingTest.Window1"
    xmlns="http://schemas.microsoft.com/winfx/2006/xaml/presentation"
    xmlns:x="http://schemas.microsoft.com/winfx/2006/xaml"
    xmlns:local="clr-namespace:BindingTest"
    Title="DataContext" Height="200" Width="200" Background="Thistle">

  <Window.Resources>
    <local:StringList x:Key="list" />
    <local:StringList2 x:Key="list2" />
  </Window.Resources>

  <Window.DataContext>
    <Binding Source="{StaticResource list2}" /> ← Window クラスの DataContext プロパティに設定
  </Window.DataContext>

  <StackPanel Orientation="Vertical">
    <ListBox Width="160" Margin="10" ItemsSource="{Binding}" /> ← ここは同じ
  </StackPanel>
</Window>
StringList2 クラスを定義します。
public class StringList2 : List<string>
{
  public StringList2()
  {
    this.Add("abcdefg");
    this.Add("hijklmn");
    this.Add("opqrstu");
  }
}
実行結果は、StringList2 が表示されます。つまり、DataContext プロパティの設定も階層化されていることが分かります。
このクラスは、XML データをバインディングソースとして使えるようにするものです。通常は XML ファイルからデータを読み込んで使います。
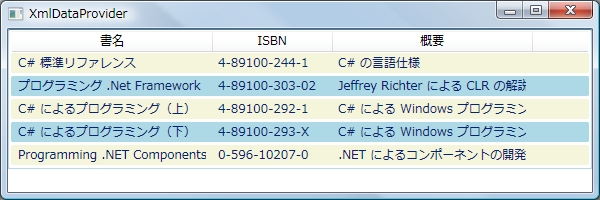
まず、XML 形式のデータファイルの内容を以下に示します。
(BookData.xml)
<Books xmlns="">
  <Book ISBN="4-89100-244-1" Stock="in">
    <Title>C# 標準リファレンス</Title>
    <Summary>C# の言語仕様</Summary>
  </Book>
  <Book ISBN="4-89100-303-02" Stock="in">
    <Title>プログラミング .Net Framework</Title>
    <Summary>Jeffrey Richter による CLR の解説</Summary>
  </Book>
  <Book ISBN="4-89100-292-1" Stock="out">
    <Title>C# によるプログラミング(上)</Title>
    <Summary>C# による Windows プログラミング</Summary>
  </Book>
  <Book ISBN="4-89100-293-X" Stock="in">
    <Title>C# によるプログラミング(下)</Title>
    <Summary>C# による Windows プログラミング</Summary>
  </Book>
  <Book ISBN="0-596-10207-0" Stock="out">
    <Title>Programming .NET Components</Title>
    <Summary>.NET によるコンポーネントの開発</Summary>
  </Book>
</Books>
次に、フォームを定義する XAML コードです。BookData.xml はプロジェクトの data フォルダ内にあります。
(Window1.xaml)
<Window x:Class="BindingTest.Window1"
    xmlns="http://schemas.microsoft.com/winfx/2006/xaml/presentation"
    xmlns:x="http://schemas.microsoft.com/winfx/2006/xaml"
    xmlns:local="clr-namespace:BindingTest"
    Title="XmlDataProvider" Height="300" Width="600">

  <Window.Resources>
    <XmlDataProvider x:Key="BookData" Source="data/bookdata.xml" XPath="Books" /> ← ルートノード "Books"

    <DataTemplate x:Key="itemTemplate">
      <TextBlock Text="{Binding XPath=Title}" VerticalAlignment="Center" />
    </DataTemplate>

    <Style TargetType="{x:Type ListViewItem}">
      <Style.Triggers>
        <Trigger Property="ItemsControl.AlternationIndex" Value="0">
          <Setter Property="Background" Value="Beige"></Setter>
        </Trigger>
        <Trigger Property="ItemsControl.AlternationIndex" Value="1">
          <Setter Property="Background" Value="LightBlue"></Setter>
        </Trigger>
      </Style.Triggers>
    </Style>
  </Window.Resources>

  <StackPanel Name="stackPanel1" Orientation="Vertical">
    <ListView ItemsSource="{Binding Source={StaticResource BookData}, XPath=Book}" AlternationCount="2">
      <ListView.View>
        <GridView>
          <GridViewColumn Header="書名" Width="200" CellTemplate="{StaticResource itemTemplate}"/>
          <GridViewColumn Header="ISBN" Width="100" DisplayMemberBinding="{Binding XPath=@ISBN}" /> ← データは属性
          <GridViewColumn Header="概要" Width="200" DisplayMemberBinding="{Binding XPath=Summary}" />
        </GridView>
      </ListView.View>
    </ListView>
  </StackPanel>
</Window>
ここまではプロパティによるバインディングだけを扱ってきましたが、ObjectDataProvider クラスを使えば XAML コードからメソッドを呼び出すこともできます。
下図の Red、Green、Blue の値を入力すると、Hue、Saturation、Lightness を計算し、表示します。
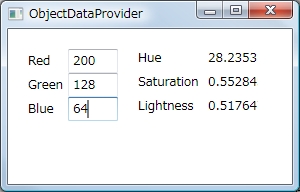
(System.Drawing.dll への参照をプロジェクトに追加のこと)
<Window x:Class="BindingTest.Window1"
    xmlns="http://schemas.microsoft.com/winfx/2006/xaml/presentation"
    xmlns:x="http://schemas.microsoft.com/winfx/2006/xaml"
    xmlns:system="clr-namespace:System;assembly=mscorlib"
    xmlns:drawing="clr-namespace:System.Drawing;assembly=System.Drawing"
    xmlns:local="clr-namespace:BindingTest"
    Title="ObjectDataProvider" Height="300" Width="300">

  <Window.Resources>
    <ObjectDataProvider x:Key="ColorProvider" ObjectType="{x:Type drawing:Color}" MethodName="FromArgb">
      <ObjectDataProvider.MethodParameters>
        <system:Int32>255</system:Int32>
        <system:Int32>255</system:Int32>
        <system:Int32>255</system:Int32>
      </ObjectDataProvider.MethodParameters>
    </ObjectDataProvider>

    <ObjectDataProvider x:Key="HueData" ObjectInstance="{StaticResource ColorProvider}" MethodName="GetHue" />
    <ObjectDataProvider x:Key="SaturationData" ObjectInstance="{StaticResource ColorProvider}" MethodName="GetSaturation" />
    <ObjectDataProvider x:Key="LightnessData" ObjectInstance="{StaticResource ColorProvider}" MethodName="GetBrightness" />

    <local:IntToString x:Key="IntToString" />
  </Window.Resources>

  <StackPanel Orientation="Horizontal" Margin="20">
    <StackPanel Orientation="Vertical">
      <StackPanel Orientation="Horizontal" VerticalAlignment="Center">
        <TextBlock Width="40" VerticalAlignment="Center">Red</TextBlock>
        <TextBox Name="txtRed" Width="50"
                 Text="{Binding Source={StaticResource ColorProvider}, Path=MethodParameters[0],
                      BindsDirectlyToSource=True, UpdateSourceTrigger=PropertyChanged,
                      Converter={StaticResource IntToString}}" />
      </StackPanel>
      <StackPanel Orientation="Horizontal">
        <TextBlock Width="40" VerticalAlignment="Center">Green</TextBlock>
        <TextBox Name="txtGreen" Width="50"
                 Text="{Binding Source={StaticResource ColorProvider}, Path=MethodParameters[1],
                      BindsDirectlyToSource=True, UpdateSourceTrigger=PropertyChanged,
                      Converter={StaticResource IntToString}}" />
      </StackPanel>
      <StackPanel Orientation="Horizontal" VerticalAlignment="Center">
        <TextBlock Width="40" VerticalAlignment="Center">Blue</TextBlock>
        <TextBox Name="txtBlue" Width="50"
                 Text="{Binding Source={StaticResource ColorProvider}, Path=MethodParameters[2],
                      BindsDirectlyToSource=True, UpdateSourceTrigger=PropertyChanged,
                      Converter={StaticResource IntToString}}" />
      </StackPanel>
    </StackPanel>

    <StackPanel Orientation="Vertical" Margin="20,0,0,0">
      <StackPanel Orientation="Horizontal" VerticalAlignment="Center">
        <TextBlock Width="60" Height="24" VerticalAlignment="Center">Hue</TextBlock>
        <TextBlock Name="txtHue" Width="50" Height="24" Margin="10,0,0,0"
                   Text="{Binding Source={StaticResource HueData}}" />
      </StackPanel>
      <StackPanel Orientation="Horizontal" VerticalAlignment="Center">
        <TextBlock Width="60" Height="24" VerticalAlignment="Center">Saturation</TextBlock>
        <TextBlock Name="txtSaturation" Width="50" Height="24" Margin="10,0,0,0"
                   Text="{Binding Source={StaticResource SaturationData}}" />
      </StackPanel>
      <StackPanel Orientation="Horizontal" VerticalAlignment="Center">
        <TextBlock Width="60" Height="24" VerticalAlignment="Center">Lightness</TextBlock>
        <TextBlock Name="txtLightness" Width="50" Height="24" Margin="10,0,0,0"
                   Text="{Binding Source={StaticResource LightnessData}}" />
      </StackPanel>
    </StackPanel>
  </StackPanel>
</Window>
分離コードで、int 型を文字列に変換するコンバータを定義する。
public class IntToString : IValueConverter
{
  public object Convert(object value, Type targetType, object parameter, CultureInfo culture)
  {
    if (value != null)
    {
      return value.ToString();
    }
    return null;
  }

  public object ConvertBack(object value, Type targetType, object parameter, CultureInfo culture)
  {
    string s = value as string;

    if (s != null)
    {
      int result;
      bool isOK = int.TryParse(s, out result);
      if (isOK)
      {
        return result;
      }
    }

    return null;
  }
}
−以上−